Bolstering Android Applications Titanium Mobile: A webkit based approach
In this chapter we are going to introduce a very different approach to programming applications on the Android platform. This approach is inspired by a new trend that began with RIA (Rich Internet Applications). Flash/Flex, Laszlo (An XML and Javascript based UI framework that uses Flash as the virtual machine), Silverlight (Microsoft's answer to Flash/Flex: again vector graphics and XML based), JavaFx (Similar to Silverlight but follows a non XML syntax for defining objects) are all examples of plug in architectures that were aimed at solving the interactivity and flash on a browser.
Taking advantage of the DOM model, many javascript libraries have joined this fray and provide a surprisingly capable RIA through DOM and Ajax. This later approach has the benefit of familiarity and allows for a development gradient where you can become more sophisticated over time and don't have to comit upfront to a specific RIA technology not to mention that you dont need a plugin.
You may ask, "well this is all fine for web based development, but what has it got to do with developing on Android as a native application". As it turns out the browser in Android is Chrome based, and which in turn is based on the (almost) ubiquitous "webkit" the engine that powers web browsers such as Firefox, Chrome, and Safari. New technologies are emerging that will allow you to drive the "webkit" natively using html and javascript files stored on the local device.
This approach has a number of advantages (and some cons). The first among them is that HTML is a simpler programming model and many programmers are very familiar with it. Even if that were to be debatable, an HTML widget like "webkit" is much more rich in crafting text and images in a very pleasing manner and style them using CSS. The new set of innovative tools are exploiting this feature. Adobe AIR is one of the prime examples commiting to this trend allowing this approach so that one can develop applications that can run on desktop operating systems.
Appcelerator, Inc. is a startup based in the valley lead by a number of leading programmers and thinkers in the opensource space and spearheading to bring this approach to not only desktops but also to mobile space including iPhone and Android.
So this chapter will introduce you to this new, but yet old, paradigm and walk you through the architecture of Titanium Mobile. We will show you how to download Titanium Mobile and develop a simple helloworld application and test it and package it so that it can be installed on your own emulator. We will then take you through a much needed tool like "JQuery" that is needed to program on the client side with out the help of a server side programming language to drive the html. Tools like "Jquery" require a much better understanding Javascript. We will cover that as well so that you can actually begin to develop a more functional application than a hello world. In fact we will write a small application that takes advantage Jquery and Jquery's micro templating engine. we will then conclude the chapter with additional native APIs that Titanium Mobile provides that you can access through javascript.
This approach to Android application development can supplement your development efforts on Android and give you a faster path to application development and also a good number of times a "prettier" path as html and CSS are pretty effective at this. Not to mention, the abstraction provided by Titanium Mobile can also make your application run on multiple mobile platforms.
Brief History of Titanium Mobile
Titanium Mobile is one of the products that Appcelerator, Inc, (http://www.appcelerator.com) introduced recently to allow web like development to the mobile platforms. From their website you can see that it is backed by Storm Ventures (http://www.stormventures.com) and their board includes folks that have been involved with DeviceVM, Netforensics, Yieldbuild and Kidaro (acquired by Microsoft), DotNetNuke, Fonality, Hyperic, Medsphere, Pentaho, SugarCRM, eHatchery, OpenVXI, and Vocalocity. Appcelerator applies the same principles of Titanium Mobile to their desktop and web based solutions as well. You can read more about the board and the founders at http://www.appcelerator.com/company/investors-board/.
With that brief introduction to the background of Titanium Mobile let us take a look at the architecture of Titanium Mobile.
Architecture and Eco System of Titanium Mobile
At the core of it Titanium Mobile is a wrapper for working with "webkit" that is available on Android and other mobile devices. It will then supplment the webkit capabilities by providing a set of javascript APIs that map to the native libraries such as filesystem, media etc. This "javascript" based abstraction gives a uniform API to a seasoned web developer to write applications to the native OS interface.
Architecture
How Titanium accomplishes this at a high level is depicted in the following figure.
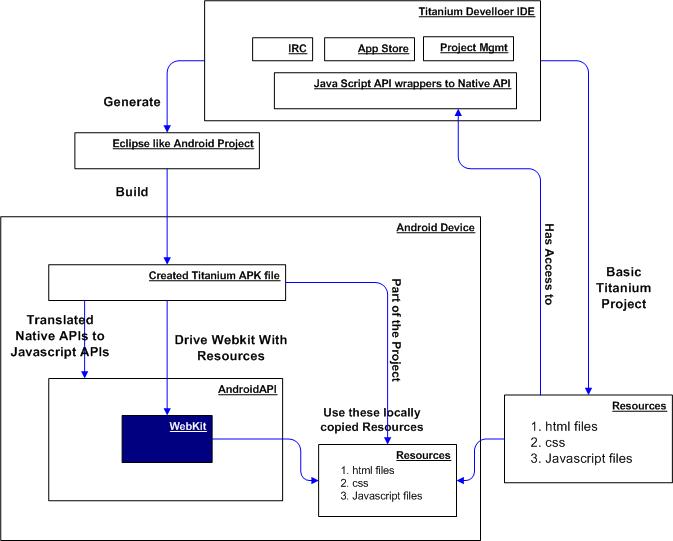
A titanium mobile project is very much like an html development project where you have an "index.html" and a series of sub directories where you keep html files, CSS files, and other Javascript libraries, both yours and third party. Titanium calls this root directory a "Resources" directory.
This Resources sub directory is created for you when you use the Titanium Developer IDE and create a project. A developer can choose to use any set of javascript libraries that he/she is familiar with. In addition there is a set of Javascript APIs that Titanium makes available to your javascript.
As a note Titanium Mobile also allows development using Ruby or Python as well just like javascript.
Lets talk about the Titanium Developer IDE for a moment. This is strictly not an IDE. It doesn't offer you any editors. However it allows you to create project directories and allows you to compile, build, test, and deploy projects. For example once you are satisfied with your edits, you can go to the Titanium Developer and test the program on the Android emulator. Titanium Mobile team recommends that each developer choose their respective IDEs to edit and work with Javascript and html.
This Titanium Deveoper has the following key components:
1. Project management: Create, build, package, test, and deploy projects (applications)
2. App Store: An application store where a community of developers can upload and download their applications
3. IRC: An internet relay chat where you can ask for help which is directly integrated into your workspace. A real convenience.
Once you ask the Titanium Developer to build and test your application (essentially the Resources directory), it will covert the files into an Android project, very similar structure to an eclipse ADT structure, and compiles them to an "apk" file. It will then take this apk file (just like the eclipse ADT) and installs it on the Android emulator.
You can repeat this process of "edit" and "test" until you are satisfied and then proceed to get a final copy of the "signed" APK file that is ready for distribution.
In the process of creating the APK file, the Titanium Developer copies the "Resources" directory to the "assets" sub directory so that the native "webkit" can access these files during execution. Also the javascript APIs will end up calling the native versions of the Java API on Android.
Titanium Eco System
At a high level that is the nature of Titanium Mobile development. However this apparent simplicity could be misleading for a traditional developer that is brought up on a strict regimen delivered by Sun or Microsoft. Like many other opensource efforts, Titanium Mobile also relies heavily on the Javascript, or more generally the dynamic languages (paired with html), eco system. This is necessary because one cannot possibly imagine that they can write large manageable applications on a simple browser with some javascript thrown in.
One will start asking how do I create menus, title bars, drag and drop etc. This is where tools like AJAX, JQuery, DOJO, and Mootools comes into play along with JSON, SQLite, Aptana, Microsoft Web Express etc. The array of tools can be frightening as each requires its own learning curve and potential future growth.
After looking these choices we have chosen "JQuery" as a good candidate as it is simple to learn, well documented, yet sufficient enough, and is expected to grow in its community.
As we go through this chapter it will become apparent why you would need these tools and how to take advantage of them. In fact by the end of this chapter you will have most things you will need to write pretty nify set of apps using this approach.
Let's see now how we can start on this brief journey by downloading the Titanium Developer.
Downloading and installing Titanium Developer
You will need to sign up for the titanium mobile before you can install and run it. The signing up and install process works the best if you are connected through the internet. A newer release seem to help with proxy setup much better but I haven't tested that version. The system is also geared to work well in a connected mode during install and also during development.
Anyway you can sign up by going to the home page of Appcelerator which is at http://www.appcelerator.com. If you don't see the button that lets you sign up you can go to it directly by typing
http://www.appcelerator.com/products/request-titanium-mobile/
Once the sign up is complete you will receive an email to download and install the Titanium Mobile. It is about 40M. The version I have tried went back to the server a few times to get the full package during the installation process. Once it is installed it will create an icon on your desktop. For this chapter we have done this on windows XP.
It is also important to note that there is no uninstall utility at this time. You will have to manually remove the directories yourself. Under windows XP you can do the following to completely remove the Titanium Developer.
Delete the following directories
\documents and settings\all users\application data\Titanium
\documents and settings\\application data\Titanium
\Program Files\Titanium (your install directory)
Here are some additional instructions on uninstalling and reinstalling the Titanium Developer.
http://support.appcelerator.net/faqs/titanium-installation/reinstalling-titanium-developer
Once installed it will set up an icon for you to invoke that looks like the following

If you click on this icon, it will start the Titanium Developer. The titanium developer will look like the following when launched
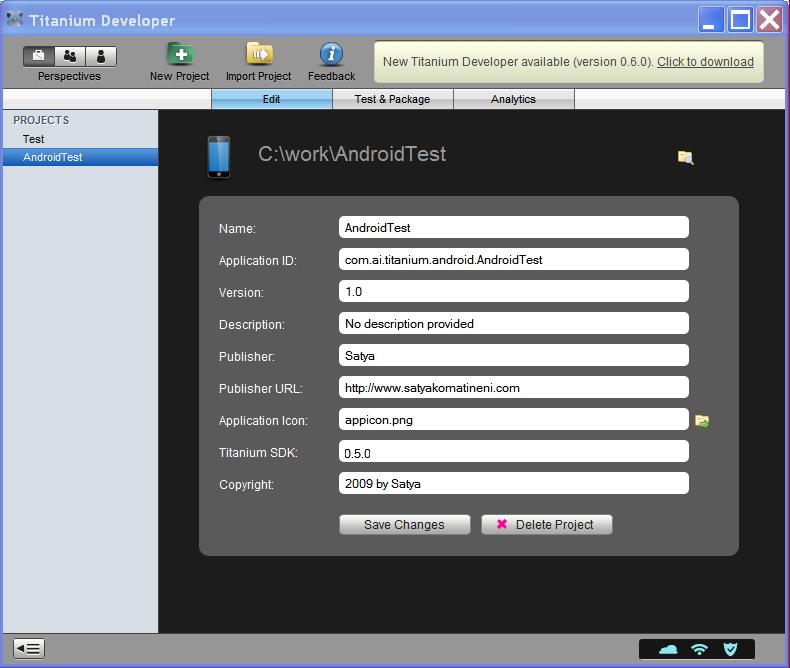
this image here has two projects already setup. You are seeing them on the left hand side. One is called "test" and one is called "AndroidTest". The "test" is a desktop application and "AndroidTest" is an Android Mobile application.
An application or project is essentially directory on your local drive. For example "AndroidTest" which is highlighted in the figure is residing at "c:\work\AndroidTest". The other parameters you see for this high lighted application are just attributes. One key attribute is the application id which is going to be used for creating the root package for the Android Package.
If you want to create one such project all you have to do is to click on the "New Project" icon at the top and it will ask you whether you want the app for a mobile platform or a desktop and takes the rest of the arguments including a directory to host the project.
While we are exploring the Titanium Developer let us show you the other aspects of this tool as well. The one you would be using often is the "Test&Package" tab. This tab when clicked on looks like the following
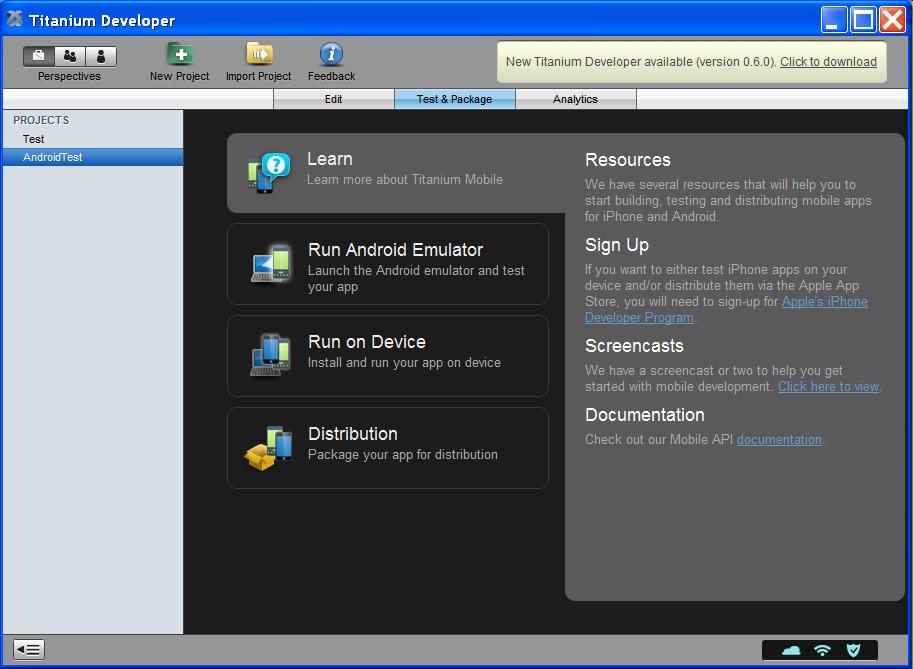
This tab is responsible for taking your project resources and deploying them to the Android emulator for testing purposes. It also allows you to run on the device and also prepare the Android application package for distribution purposes. This includes taking the package and installing it on a different emulator on a different development box or moving it to the Android market place and moving it to the Titanium App store. We will cover some of these later in the chapter.
Another nifty feature of the Titanium Developer tool is the Application store that you can browse for working applications. Here is the screenshot of this face of the tool
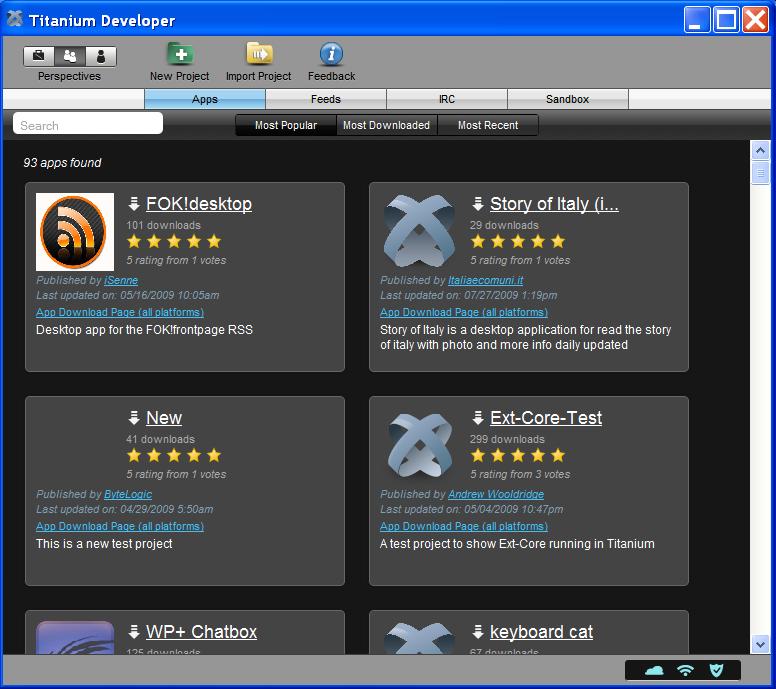
The Titanium Developer also comes with a scratch pad that you can quickly use to test sample code. This tab looks like the following:
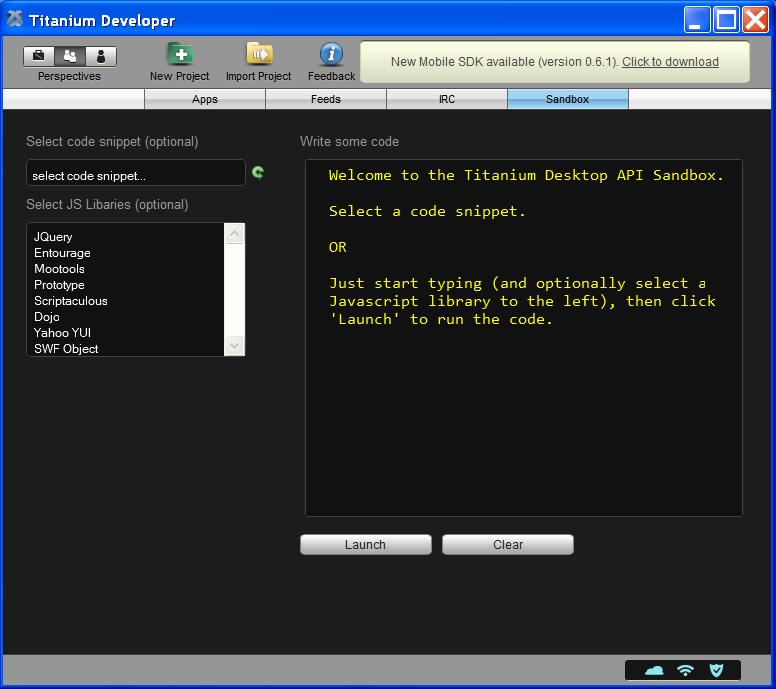
A few things are evident from this figure. You can see that Titanium works in unision with a number of other tools such as JQuery, Entourage, Mootools, Prototype, Scriptaculous, Dojo, Yahoo YUI, SWF Object, etc. The launch window allows you to type any valid html/javascript and executes it.
You can try the following example for instance. Type the following and click on the launch button.
<html><head></head>
<body>
<h2>Hello World</h2>
</body></html>
This will show you a screen with "Hello World" in it. Next you can try adding some script to it as follows
<html><head></head>
<body>
<h2>Hello World</h2>
<script>
alert('hello there');
</script>
</body></html>
Let us conclude this installation section by showing their IRC tab where you can interactively work with other online developers. Here is that tab
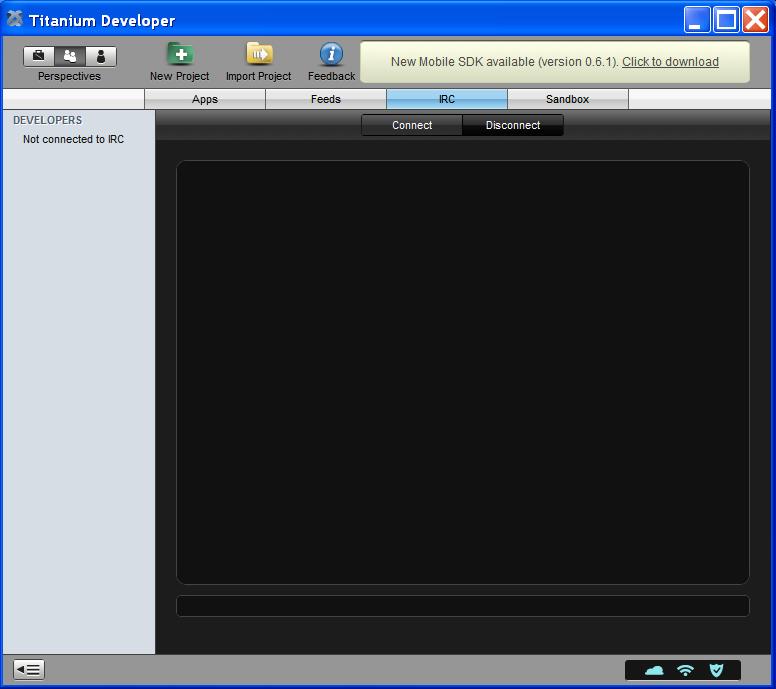
Lets now move on to take these helloworld examples and create a project and see if we can move them on to an Android emulator.
Hello world in a real project
Let's go ahead and formalize the hello world example from the previous section. Let's open the titanium developer and create a new project which has the characteristics as shown in fig1. This will create a project on your local drive as follows
c:\work\AndroidTest1
   \build
      \android\<elcipse like project structure>
   \Resources
      \android\appicon.png
            \default.png
      \<your files and sub directories go here>
      \index.html
      \index.css
      \about.html
   \manifest
   \tiapp.xml
Let us take a look at this directory structure in some detail. The key directory as indicated in the architecture section is the "Resources" sub directory. This is where you keep the html files, css file, javascript files etc. You can have as many sub directories as you want from here to realize your application.
Outside of this directory, under the root, the key file is the "tiapp.xml" which defines what it means to be a titanium project. Let us take a look at the "tiapp.xml" that gets generated by default when you created this project. Here it is:
<?xml version="1.0" encoding="UTF-8"?>
<ti:app xmlns:ti="http://ti.appcelerator.org">
    <id>com.ai.titanium.android.AndroidTest1</id>
    <name>AndroidTest1</name>
    <version>1.0</version>
    <icon>appicon.png</icon>
   <persistent-wifi>false</persistent-wifi>
   <prerendered-icon>false</prerendered-icon>
   <statusbar-style>opaque</statusbar-style>
    <windows>
        <window>
            <id>initial</id>
            <url>index.html</url>
            <backgroundColor>#111</backgroundColor>
         <icon>ti://featured</icon>
         <barColor>#000</barColor>
         <fullscreen>false</fullscreen>
        </window>
        <window>
            <id>about</id>
            <url>about.html</url>
            <backgroundColor>#111</backgroundColor>
         <icon>ti://top rated</icon>
            <barColor>#000</barColor>
         <fullscreen>false</fullscreen>
        </window>
    </windows>
</ti:app>
As this chapter is primarily focussed on giving you a general introduction and approach to Titanium development, we won't go into each of the xml tags in tiapp.xml. You could alwasy read them up by visiting the appcelerator community site at http://www.appcelerator.com/community/. In this particular context of getting started the following URL is useful as well http://www.codestrong.com/timobile/guides/get_started/
With that we would like to talk about the "windows" tag which defines how many html files we want the app to display in multiple tabs. In the file here we have two windows one pointing to index.html and the second pointing to about.html.
With these files in place, which the new project has created, you can turn to the "package/test" tab of the titanium developer (see fig ) and choose to run the project in the emulator.
When you run this your newly created application it looks like the following in the emulator
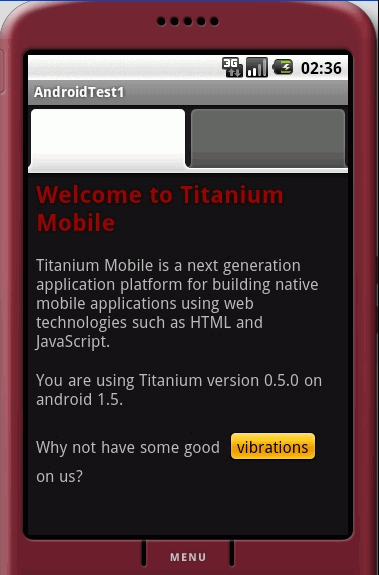
If you take a look at the index.html and about.html you will see that index.html is populated into the first tab.
Let us see how we can simplify this initial project by getting rid of the tabs and provide just one window and also change the background color to white so that the first page will look like the following:

Let us show you the index.html that you will need to make this web page.
<html><body>
<h2>Hello World</h2>

<p><a href="javascript:alert('hello')">
Click here to execute javascript
</a></p>

</body></html>
This is simple enough. When you click on the link that says "click here to execute javascript" it will call the javascript alert function to say "hello". Go a head and change your index.html to reflect this. You will also need to tell the "tiapp.xml" that there is only one window and its background is white.
So change the tiapp.xml as below
<?xml version="1.0" encoding="UTF-8"?>
<ti:app xmlns:ti="http://ti.appcelerator.org">
    <id>com.ai.titanium.android.AndroidTest2</id>
    <name>AndroidTest</name>
    <version>1.0</version>
    <icon>appicon.png</icon>
   <persistent-wifi>false</persistent-wifi>
   <prerendered-icon>false</prerendered-icon>
   <statusbar-style>opaque</statusbar-style>
    <windows>
        <window>
            <id>initial</id>
            <url>index.html</url>
            <backgroundColor>white</backgroundColor>
         <icon>ti://featured</icon>
         <barColor>#000</barColor>
         <fullscreen>false</fullscreen>
        </window>
    </windows>
</ti:app>
Notice that there is only one window now pointing to the index.html and also its background color stated as white. As I am going through these examples notice that I am incrementing the application title as "AndroidTest1", "AndroidTest2" etc. You dont have to do it this way. We are doing this because we want to make it easier to get screenshots in a repeatable fashion. Otherwise once we change the code we will loose the old test case. Hopefully that is a minor distraction that you can follow.
With index.html and tiapp.xml in place, you can package and test this application in the emulator. You will see figure 1 when you run this. However you will notice that the javascript will just not say "hello". Apparently appcelerator overrode this function to write the message to an internal debug console.
So let us go ahead and use other means of doing something similar. Here is the modified index.html.
Real index.html
<html>
<head>

<script>
function myalert(message)
{
   var a = Titanium.UI.createAlertDialog();
   a.setMessage(message);
   a.setTitle('My Alert');
   a.setButtonNames(["OK"]);
   a.show();
}

function dalert(message)
{
   Titanium.API.info(message);
   alert(message);
   //var a = prompt(message);
   myalert(message);
}
</script>

</head>

<body>
<h2>Hello World</h2>

<p><a href="javascript:dalert('hello')">
Click here to execute javascript
</a></p>

</body></html>
There are two work arounds to this problem demonstrated here. The first alternative is to use the Titanium UI api for creating a native Android alert dialog with an OK button. This works well, but you must be aware that native alert dialogs in android are asynchronous and also needs to be reference counted for efficiency. So you may want to use these sparingly.
The second option is to use the titanium debug api to log debug messages instead of alerts. These messages will go to the console window that is shown in figure 1.
Interestingly though the "prompt" javascript function works fine. Any way if you were trying this first time we want to mention this surprise you may run into.
Let us recap what we have done so far. we know how to create a project and populate the resources directory with necessary html files and test them in the emulator. At this time we can take two paths for further exploration. On one side we want to know how we would release this project as an APK file that can be installed on another emulator or in a market place. On the otherside we want to know what other technologies we need to know to develop real world applications, such as Jquery. After much thought we have decided to cover them in the same order. we will first show you how to move this to an apk file and then go on to using Jquery to develop more robust html applications. Again we will introduce you to the basic precepts and ideas and then you will have much to do to take the approach further.
Packaging the application
In Android the unit of deployment is an android package file called "APK" files. You can refer to the earlier chapter on Security and Localization to get more details of how to work with these APK files. You will need one of these APK files to move around your application to other places.
According to Android an APK file has to be signed. In fact when you develop and test android applications through the eclipse adt, the adt is actually signing them with a built in key that is only good for test deployment in emulator etc. Android also treats the apk files that are installed with the same signature a bit more special where they can share process space. This may be good or bad depending on how much isolation you would like. The signature is also important for installing updates to that application.
For more information on signing the application read the following article from Android
http://developer.android.com/guide/publishing/app-signing.html
As a side note Android keeps the debug or development time keystores at the following locations. On OS X and Linux
~/.android/debug.keystore
for windows xp
C:\Documents and Settings\\.android\debug.keystore
for windows Vista
C:\Users\\.android\debug.keystore
To sign an apk file you will need to understand the "key" infrastructure that is provided by JDK. You will need to use "keytool" from JDK to create a key store with a password. This is covered well in the security chapter but I will repeat it here for quick reference. Here is an example of creating a keystore along with one key called "mykey" with "/jre/bin/keytool":
keytool
  -genkey //generate a public/private key
  -alias mykey //name of the key
  -keystore c:\somekeystore.store //location of a store
  -storepass abc //password
  -keypass abc //password
  -keyalg RSA //key algorithm
  -validaty 14000 //how many days is it valid
Here is an excellent set of coverage on key tool from JDK
http://java.sun.com/j2se/1.3/docs/tooldocs/win32/keytool.html
Once you have the keystore created you can use the "distribution" tab (see figure "packaging") to create an APK file. Titanium developer will prompt you for a key name to sign the package with. It will need to know the keystore and keystore password. If you don't remember the key name (also called alias) you can use the keytool to list the "keystore" for you. But at the minimum you will need to write down and keep the keystore location and password somewhere safe. Here is an example of listing a keystore keytool -list c:\somekeystore.store
Under the covers Titanium uses "jarsigner" (jarsigner is also covered in chapter on security) to take the key alias you have specified and sign the apk file. Titanium will then create the physical "apk" file in the directory that you have specified.
it is worth noting here that the eclipse ADT (as explained in chapter on security) allows you to create an apk file unsigned (and then you will use the keytool and jarsigner to sign it yourself) but the titaninum developler uses only the signed approach.
Installing the apk file on your own emulator
With the apk file in your hand you can proceed to install that file in an android emulator that you normally use to test your other android applications. To do this you will need to start the emulator by doing the following
\android\tools\emulator @avdname
where "avdname" is the name of your android virtual device. Refer to "getting your feet" wet chapter on what avds are and how to create them. The above command will start the emulator. Once that is accomplished you can use the following commands to install and uninsall that package
adb install [-l] [-r]
- push this package file to the device and instal it
      ('-l' means forward-lock the app)
      ('-r' means reinstall the app, keeping its data)

adb uninstall [-k]
- remove this app package from the device
      ('-k' means keep the data and cache directorie)
Notice how during the install you are using the filename and during uninstall you are using the fully qualified "java" like package name. For our AndroidTest2 application the fully qualified package name will be
com.ai.android.titanium.AndroidTest2
you can also use the emulator or the device directly to uninstall any application. Here are the steps for that kind of an approach
1.Start the emulator
2.From menu choose dev tools
2.Go to Package Browser and locate your package
4.Choose menu while hightlighting the package name
5.Take delete
It is worthwhile to restate a quick way to get to your emulator manually (usually one forgets this as this is normally done automatically through eclipse). Here are the refresher steps
\tools\android list avd // lists avds available
\tools\emulator @avdname // start a specific avd
Ofcourse after going through all this you will be able to run your app and you will see the same as in figure 1. This concludes how you go about unhinging an application from titanium and move it off to another place for consumption.
We will leave this section with another nifty thing you can do with your titanium project. As part of the build Titanium actually creates a subdirectory called "android" under build. This directory is actually a full fledged eclipse adt project. All you have to do on windows is to move the tiapp.xml and the Resources sub directory into this build/android/assets. Then the "build/android" sub directory is complete and now you can test or develop further in the android native environment. You may have to delete R.java if you see build errors.
writing real world applications with JQuery
The proposition so far in this chapter is that give me html, give me javascript and I will write all my application with it. How practical is that? In almost any application you will need mechanisms to program a flexible UI with forms, media etc. Then you will need something to host your business logic and then you will need something to read and persiste your state in a database.
Let us talk about simpler things first. the middleware and the data. Javascript through AJAX and JSON can always request data through servers which can act as conduits for persistence and also some or all business logic. If the application were to access some local resources or local databases they could always do that with SQLite. But one could expect that cloud services and three tier model is better anyways except for some special cases. So one could foresee no significant problems with this approach.
A UI framework is a different beast on the other hand. Things like swing, and wpf are complex frameworks that aim to do the same that html and javascript seem to say that they are capable in this approach. Moreover the javascript also needs to receive data and then translate that (or set) into a set of visual controls using html. There is no particular UI object model other than html. Although a number of hurdles remain, a tool like JQuery that is based on javascript gives a powerful model to dynamically alter html DOM tree to suit your needs.
This JQuery is surprisingly nimble, simple, and extensible. The "query" in JQuery comes from its ability to query any node in an html DOM through succinct syntax like CSS selectors and XSLT expressions. We will go through few examples in this chapter to show you how this works.
JQuery is just one of the tools in this genre of tools that use html and javascript for extensive UI programming. You are free to investigate these alternatives and choose an appropriate one for your liking.
With that said let us give you a quick enough tour of JQuery.
Essential Primer on JQuery
You can find the homepage of JQuery at http://jquery.com/. The documentation is overall very good. This makes it a good tool for picking it up quick and use it in your regular html development very easily. All it is is a javascript file that you download and include in your html page.
Let us see what we can do with it. One common thing you want to do in html is to locate a div or a paragraph and replace the contents of that element with some text. Or change the style of that div or hide that div. So let us do each of these.
function replaceAParagraph(newText)
{
   //locate the html element with an ID
   //it returns an array of matching elements
   var myParagraph = $("#MyParagraphID")[0];

   //read the old html from the element
   var oldText = myParagraph.html();

   //replace it with the new
   myParagraph.html(newText);

   //or simpler format
   $("#MyParagraphID").html(newText);

   //change the style of that element
   $("#MyParagraphID").css("color:red;");

   //hide the element
   $("#MyParagraphID").hide();
}
The "$" is a function that belongs to JQuery that uses selectors to locate the needed element. Its syntax for getting at an element is elaborate and forms the core of JQuery. Here are some of many ways of using a selector:
$("#MyElementID") // A specific id
$(".MyClass") //all elements matching this class
$("p") // all paragraphs
$("p.MyClass") //paragraphs with MyClass
$("div") // all divs
$(".MyClass1.MyClass2.MyClass3") // locate three classes
$("div,p,p.MyClass,#MyElementID") //matching all those

//Immediate children
$("#Main > *") // All children of Main
$("parent > child")

//Children and grand children
$("ancestor descendents")
$("form input") // all input fields in a form

$("label + input") // all inputs next to a label
$("prev + next")

//starting at myclass find siblings of type div
$(".myclass ~ div")
$("prev ~ next)
Once a certain set of elements are selected using these selectors, you can filter the output nodes further by using the following filter syntax
$("selector:criteria")
Here is how you use this
$("tr:even").css("background-color", "#bbbbff");
This example selects every row of a table which is an "even" row and then sets it style. some of the possible criteria are
first
last
even
odd
eq(index)
lt(index)
gt(index)
header //(h1, h2 etc)
animated
Here are a few more examples
function hoverParagraph()
{
   $("p").hover(function () {
        $(this).css({'background-color' : 'yellow', 'font-weight' : 'bolder'});
      }, function () {
        var cssObj = {
         'background-color' : '#ddd',
         'font-weight' : '',
         'color' : 'rgb(0,40,244)'
        }
        $(this).css(cssObj);
      });
}
This is an example where a paragraph is located and a set of call back functions are registered for a "hover" action. The first function changes the CSS of the paragraph to yellow background and font weight bold. The second function changes it to a different CSS when the hover is off.
working with a mouseover
function paragraphMouseover()
{
   $("p").mouseover(function () {
        $(this).css("color","red");
      });
}
This is an example where the CSS of a paragraph is changed with annonymous function on a mouse over.
Essential Primer on Advanced Javascript
As you start adapting javascript centric technologies such as JQuery or Titanium (through its javascript API) you will start noticing javascript patterns that are quite unusual to someone that only uses javascript occasionally to supplement web pages.
The first of these surprises come from the array and object equivalence. Let us lay this mystery out. Let us start with an object declaration or initialization in javascript.
var myobj = {};
The curly braces in the context above defines the start and end of an object initialization. In this example we have nothing inside the curly braces. This tells javascript that myobj is an object with no content or members in it. Let us extend this initialization pattern
var myobj = {name:"phone-number1",value:"123456"};
This statement allows you to do the following:
alert(myobj.name());
or
alert(myobj["name"]);
This proves the equivalence of associative arrays and objects. This goes to show that an objects members are represented internally as an associative array. The converse is true too.
var myobj={};
myobj["name"] = "aaaa";
myobj["value"] = "bbbb";
then the following two statements will be identical as well
alert(myobj.name());
or
alert(myobj["name"]);
This sort of object initialization is pretty handy. Consider the following snippet which we will use in a subsequent section var itemArray = [
     {name: "Social", value: "12345678"},
     {name: "cell1", value: "12345678"},
     {name: "cell2", value: "12345678"}
];
This quickly defines an array of 3 objects. Each object holding a name, value pair as their fields. The object initialization pattern allows nested objects as well. Here is an example
   var someobj = {field1:10,
   field2:"string",
   field3:{field1:10,field2:"string"));
This essentially forms the basis of JSON.
Let us now talk briefly about annonymous functions. Consider the following example
function Person() {
  var age = 40; //init value
  this.setAge = function(howold) { age = howold };
  this.firstname = "First";
  this.lastname = "Last";
}

var me = new Person();
me.firstname = "aaaa";
me.lastname = "bbbb";
me.setAge(25);
//the following will be wrong
me.age=44;
In the example above the member "setAge" is defined as an annonymous function with access to the private variable "age". where as the firstname and lastname are public variables.
We will conclude this section with a discussion of javascript namespaces as they are used quite a bit in javascript based libraries.
Consider the following pattern which is often quoted as approach to maintain namespaces in javascript:
var DED = function() {
   return {
      method_1 : function() {
         // do stuff here
      },
      method_2 : function() {
         // do stuff here
      }
   };
}();
It is quite revealing to understand the pattern. At a high level this allows you to do
DED.method_1();
DED.method_2();
The "DED" prefix will allow the author from not conflicting with other libraries. But let us understand what is happening. Let us start with the "return" statement. If you see the pattern
var someobj = {method_1: function() {}, method_2: function2() {}}
This is essentially an object initialization where the object has two members method_1 and method_2 and each is an annonymous function. So if this is an object then the above statement is
var DED = function() { return someobj; }();
DED.method_1();
DED.method_2();
Sometimes you will see this pattern written as
var DED = (function() {
   return {
      method_1 : function() {
         // do stuff here
      },
      method_2 : function() {
         // do stuff here
      }
   };
})();
Understanding the Microtemplating Engine
As soon as you start programming html as if it is a UI framework, you will quikly realize you could benefit from a templating engine that is used in technologies like JSP or ASP. Consider the following javascript array for example
     {name: "Social", value: "12345678"},
     {name: "cell1", value: "12345678"},
     {name: "cell2", value: "12345678"}
];
Say you want to create an html that looks like
Social
12345678
Cell1
12345678
Cell2
12345678
It is really painful, even with the convenience of a Jquery to create all those html nodes on the fly. Instead you would want to use a template that looks like a typical jsp page as follows:
<#
for(var i=0; i < itemArrayData.length; i++)
{
      var item = itemArrayData[i];
#>
    <p><#=item.name #>:<#=item.value #></p>
<# } #>
Where the <%= of JSP is replaced with <#. To expand this template against the above javascript data set you will need somekind of a template engine that can be executed in Javascript. John Resig, the author of JQuery, wrote one such templating engine which is then come to be called micro templating engine due to its tiny size.
Here is the whole source code of it (which you can save it in a file for inclusion)
var _tmplCache = {}
this.parseTemplate = function(str, data) {
    /// <summary>
    /// Client side template parser that uses <#= #> and <# code #> expressions.
    /// and # # code blocks for template expansion.
    /// NOTE: chokes on single quotes in the document in some situations
    ///       use ’ for literals in text and avoid any single quote
    ///       attribute delimiters.
    /// </summary>
    /// <param name="str" type="string">The text of the template to expand</param>
    /// <param name="data" type="var">
    /// Any data that is to be merged. Pass an object and
    /// that object's properties are visible as variables.
    /// </param>
    /// <returns type="string" />
    var err = "";
    try {
        var func = _tmplCache[str];
        if (!func) {
            var strFunc =
            "var p=[],print=function(){p.push.apply(p,arguments);};" +
                        "with(obj){p.push('" +
            //                        str
            //                  .replace(/[\r\t\n]/g, " ")
            //                  .split("<#").join("\t")
            //                  .replace(/((^|#>)[^\t]*)'/g, "$1\r")
            //                  .replace(/\t=(.*?)#>/g, "',$1,'")
            //                  .split("\t").join("');")
            //                  .split("#>").join("p.push('")
            //                  .split("\r").join("\\'") + "');}return p.join('');";

            str.replace(/[\r\t\n]/g, " ")
               .replace(/'(?=[^#]*#>)/g, "\t")
               .split("'").join("\\'")
               .split("\t").join("'")
               .replace(/<#=(.+?)#>/g, "',$1,'")
               .split("<#").join("');")
               .split("#>").join("p.push('")
               + "');}return p.join('');";

            //alert(strFunc);
            func = new Function("obj", strFunc);
            _tmplCache[str] = func;
        }
        return func(data);
    } catch (e) { err = e.message; }
    return "< # ERROR: " + err.htmlEncode() + " # >";
}
Let me know show you an index.html that uses the concepts and takes that array and generates an html representation. You will need to download and include the jquery.js either from titanium or from the jquery website. You will need to create the template-engine.js using the code above and place them in an appropriate sub directory of the Resources.
<html><head>
<script src="../../js/jquery132-dev.js"></script>
<script src="../../js/template-engine.js"></script>


<script>
//Data
var itemArray = [
               {name: "Social", value: "12345678"},
               {name: "cell1", value: "12345678"},
               {name: "cell2", value: "12345678"}
             ];

function onloadFunction()
{
   var s = $("#MyTemplate").html();
   var s1 = parseTemplate(s, {itemArrayData: itemArray});
   $("#target").html(s1);
}
</script>

<script id="MyTemplate" type="text/html">
 <#
 for(var i=0; i < itemArrayData.length; i++)
 {
      var item = itemArrayData[i];
 #>
     <p><#=item.name #>:<#=item.value #></p>
 <# } #>
</script>

</head>

<body onload="onloadFunction()">
<div id="target">
<p>target</p>
</div>
</body></html>
Here is what this code does. In the body of the html it defines a "div" with an id "target". On document load the function onLoadFunction() runs the template against the data using the parsetemplate method. It uses the jquery selectors to locate the template first which is anchored as a script element with id "MyTemplate". The output from the parse template will be an expanded string. This string will then be inserted into the div as inner html. Again we use the jquery selector to locate the target div.
If you make this your index.html in your previous project and test it you will a screen that looks like the following in your emulator.
figure tbd
Additional Titanium Mobile APIs
Titanium mobile supports a number of additional APIs to work with the native platform. You can discover these at http://www.codestrong.com/timobile/api/
We will mention some of them briefly here to tell you what is out there
API
Accelerometer
App
Database
Fielsystem
Geolocation
Gesture
Media
Network
Platform
UI
Here is a brief description of each namespace and what it contains.
API: has all the logging methods.
Accelerometer: ability to listen and respond to accelerometer events
App: You can get your projects properties here at run time
Database: Allows you to execute and work with SQLite database
Fielsystem: Ability to work with local files and directories
Geolocation: to get lat longs and watch for a certain location
Gesture: work with portrait, landscape views
Media: ability to work with images, sounds, videos
Network: Basic networking stack around httpclient
Platform: You can work with things such as, phone number, model, name, version etc.
UI: The additional ui controls include dialogs, menus, tables.
Significance of this approach
This webkit based approach can supplement the android framework with the following qualities
1. Quick development due to easier layout semantics of html
2. A Rich Text based UI development that can be styled with CSS
3. Cross platform appeal
4. Developers that are already familiar with html technologies
Summary
We have covered a lot of ground in one chapter on a very innovative approach to supplement your programming tool kit for Android. The progress that is being made on the UI side for web frameworks is bound to spill and enrich this programming experience further with the introduction of HTML5. We have given you a lot of information in this chapter to understand the implications and architecture of this technology and see how suitable it is to your needs. We believe this is a fun technology to program in and the tool sets involved are widely popular and lot of documentation is available on the internet.
