Principles of Compound Controls: A semi article
satya - Thu Nov 01 2012 09:36:57 GMT-0400 (Eastern Daylight Time)
Here are General steps at high level
Derive from a layout
Load layout in the constructor
Use Merge as the start of your custom layout xml
  Note: merge doesn't have any attributes
  All children of merge become the children of your layout.
If necessary assume your context is activity
  This is needed for getting fragment manager
  This allows you to use fragment dialogs
  inside your compound control.
You can use fragment dialogs
Create a class for your fragment dialog
  Use fragment manager from the activity
  Set the arguments bundle with your compound control id
  Restore pointer to compound control onActivityCreated()
Override view state management
Read custom attributes
  Use enums where appropriate
These steps are based on the initial approach and if I discover something new I will update this or post here. I will give out source code samples for each of the steps indicated here.
satya - Thu Nov 01 2012 09:39:01 GMT-0400 (Eastern Daylight Time)
Goal of the sample that I am going to cover
Create a custom compound control that allows you to specify 2 dates and get the duration in weeks or days between those dates. The custom controll will have two text fields for the two dates and two buttons to invoke fragment date picker dialogs.
satya - Thu Nov 01 2012 09:41:30 GMT-0400 (Eastern Daylight Time)
Derive from a layout
public class DurationControl
extends LinearLayout
implements android.view.View.OnClickListener
{
...
The onclick listener is there to listen to the two buttons and kick off the fragment dialog to gather the dates.
satya - Thu Nov 01 2012 09:42:57 GMT-0400 (Eastern Daylight Time)
Here is the layout file
<?xml version="1.0" encoding="utf-8"?>
<merge xmlns:android="http://schemas.android.com/apk/res/android">
<LinearLayout
    android:orientation="horizontal"
    android:layout_width="fill_parent"
    android:layout_height="wrap_content"
>
<TextView
   android:id="@+id/fromDate"
    android:layout_width="0dp"
    android:layout_height="wrap_content"
    android:text="Debut Text Appears here"
    android:layout_weight="70"
    />
<Button
   android:id="@+id/fromButton"
    android:layout_width="0dp"
    android:layout_height="wrap_content"
    android:text="Go"
    android:layout_weight="30"
    />
</LinearLayout>
<LinearLayout
    android:orientation="horizontal"
    android:layout_width="fill_parent"
    android:layout_height="wrap_content"
>
<TextView
   android:id="@+id/toDate"
    android:layout_width="0dp"
    android:layout_height="wrap_content"
    android:text="Debut Text Appears here"
    android:layout_weight="70"
    />
<Button
   android:id="@+id/toButton"
    android:layout_width="0dp"
    android:layout_height="wrap_content"
    android:text="Go"
    android:layout_weight="30"
    />
</LinearLayout>
</merge>
Notice that the merge has no additional attributes in it. All children of merge become the children of parent layout specified by this control.
satya - Fri Nov 02 2012 15:38:17 GMT-0400 (Eastern Daylight Time)
Here is how you load the custom layout for the compound control in the constructor
public DurationControl(Context context) {
  super(context);
  initialize(context);
}

...other constructors that are there to read custom attributes
...Which also call initialize(context)

private void initialize(Context context)  {

  //Get the layout inflater
  LayoutInflater lif = (LayoutInflater)
  context.getSystemService(Context.LAYOUT_INFLATER_SERVICE);

  //inflate the custom layout of previous listing
  //Use the second argument to attach the layout
  //as a child of this layout
  lif.inflate(R.layout.duration_view_layout, this);

  //Initialize the buttons
  Button b = (Button)this.findViewById(R.id.fromButton);
  b.setOnClickListener(this);
  b = (Button)this.findViewById(R.id.toButton);
  b.setOnClickListener(this);

  //Allow view state management
  this.setSaveEnabled(true);
}
satya - Thu Nov 01 2012 09:43:27 GMT-0400 (Eastern Daylight Time)
Here is how this compound is specified in your activity
<?xml version="1.0" encoding="utf-8"?>
<LinearLayout xmlns:android="http://schemas.android.com/apk/res/android"
    xmlns:apptemplate="http://schemas.android.com/apk/res/com.androidbook.compoundControls"
    android:orientation="vertical"
    android:layout_width="fill_parent"
    android:layout_height="match_parent"
    >
<TextView
   android:id="@+id/text2"
    android:layout_width="fill_parent"
    android:layout_height="wrap_content"
    android:text="Custom Hello"
    />
<com.androidbook.compoundControls.DurationControl
   android:id="@+id/durationControlId"
    android:orientation="vertical"
    android:layout_width="fill_parent"
    android:layout_height="wrap_content"
    />
<TextView
   android:id="@+id/text1"
    android:layout_width="fill_parent"
    android:layout_height="wrap_content"
    android:text="Debug stuff shows here"
    />
</LinearLayout>
satya - Thu Nov 01 2012 09:44:31 GMT-0400 (Eastern Daylight Time)
So whether to layout your controls in merge vertically or otherwise is specified
...where you specify the custom component and not in the merge node!!
satya - Thu Nov 01 2012 09:48:13 GMT-0400 (Eastern Daylight Time)
If you need a fragment manager from your custom view
private FragmentManager getFragmentManager()
    {
      Context c = getContext();
      if (c instanceof Activity)
      {
         return ((Activity)c).getFragmentManager();
      }
      throw new RuntimeException("Activity context expected instead");
    }
I could not find a way to reliably get a fragment manager all the time. So I have assumed that the context is an activity. If not throw an exception and raise hands. Fragment managers are attached to activity. So not sure if this control would work at all if the context is not an activity.
of course because this component is using fragment dialogs we are in this predicament. You could have a compound control that doesn't invoke fragment dialogs. In that case you are fine and the rest of the article should be valid.
satya - Thu Nov 01 2012 09:49:18 GMT-0400 (Eastern Daylight Time)
Here is how you invoke fragment dialogs from buttons
public void onClick(View v)
   {
      Button b = (Button)v;
      if (b.getId() == R.id.fromButton)
      {
          DialogFragment newFragment = new DatePickerFragment(this,R.id.fromButton);
           newFragment.show(getFragmentManager(), "com.androidbook.tags.datePicker");
           return;
      }

      //Otherwise
       DialogFragment newFragment = new DatePickerFragment(this,R.id.toButton);
        newFragment.show(getFragmentManager(), "com.androidbook.tags.datePicker");
        return;
   }//eof-onclick
satya - Thu Nov 01 2012 09:52:01 GMT-0400 (Eastern Daylight Time)
Here is how the DatePickerFragment looks like that invokes the date picker dialog
public class DatePickerFragment extends DialogFragment
   implements DatePickerDialog.OnDateSetListener
{
   public static String tag = "DatePickerFragment";
   private DurationControl parent;
   private int buttonId;

   public DatePickerFragment(DurationControl inParent, int inButtonId)
   {
      parent = inParent;
      buttonId = inButtonId;
      Bundle argsBundle = this.getArguments();
      if (argsBundle == null)
      {
         argsBundle = new Bundle();
      }
      argsBundle.putInt("parentid", inParent.getId());
      argsBundle.putInt("buttonid", buttonId);
      this.setArguments(argsBundle);
   }

   //Default constructor
   public DatePickerFragment()
   {
      Log.d(tag,"constructed");
   }
   @Override
   public Dialog onCreateDialog(Bundle savedInstanceState)
   {
      //this.establishParent();
      // Use the current date as the default date in the picker
      final Calendar c = Calendar.getInstance();
      int year = c.get(Calendar.YEAR);
      int month = c.get(Calendar.MONTH);
      int day = c.get(Calendar.DAY_OF_MONTH);

      // Create a new instance of DatePickerDialog and return it
      return new DatePickerDialog(getActivity(), this, year, month, day);
   }

   public void onDateSet(DatePicker view, int year, int month, int day) {
   // Do something with the date chosen by the user
      parent.reportTransient(tag, "date clicked");
      parent.onDateSet(buttonId, year, month, day);
   }

   @Override
   public void onActivityCreated(Bundle savedInstanceState) {
      // TODO Auto-generated method stub
      super.onActivityCreated(savedInstanceState);
      Log.d(tag,"DatePickerFragment onActivity created called");
      this.establishParent();
   }

   private void establishParent()
   {
      if (parent != null) return;
      Log.d(tag, "establishing parent");
      int parentid = this.getArguments().getInt("parentid");
      buttonId =  this.getArguments().getInt("buttonid");
      View x = this.getActivity().findViewById(parentid);
      if (x == null)
      {
         throw new RuntimeException("Sorry not able to establish parent on restart");
      }
      parent = (DurationControl)x;
   }
}
There are lot of cool things here around dancing with fragment specific details.
satya - Thu Nov 01 2012 09:54:39 GMT-0400 (Eastern Daylight Time)
Here is how you call a constructor the first time and put them in a bundle
public DatePickerFragment(DurationControl inParent, int inButtonId)
   {
      parent = inParent;
      buttonId = inButtonId;
      Bundle argsBundle = this.getArguments();
      if (argsBundle == null)
      {
         argsBundle = new Bundle();
      }
      argsBundle.putInt("parentid", inParent.getId());
      argsBundle.putInt("buttonid", buttonId);
      this.setArguments(argsBundle);
   }
Notice we save the view id so that we can get back to it when the device rotates. We also save the button id that invokes this dialog so that we can pass it back through the call back funtion. We have one dialog fragment that gets invoked from both buttons. So the caller (our compound view) needs to know when called back which button invoked this date dialog.
satya - Thu Nov 01 2012 09:55:58 GMT-0400 (Eastern Daylight Time)
Here is how restore the parent
@Override
   public void onActivityCreated(Bundle savedInstanceState) {
      // TODO Auto-generated method stub
      super.onActivityCreated(savedInstanceState);
      Log.d(tag,"DatePickerFragment onActivity created called");
      this.establishParent();
   }

   private void establishParent()
   {
      if (parent != null) return;
      Log.d(tag, "establishing parent");
      int parentid = this.getArguments().getInt("parentid");
      buttonId =  this.getArguments().getInt("buttonid");
      View x = this.getActivity().findViewById(parentid);
      if (x == null)
      {
         throw new RuntimeException("Sorry not able to establish parent on restart");
      }
      parent = (DurationControl)x;
   }
when the device is rotated while we are in this dialog the parent view needs to be reestablished. And also the button ids needs to be put back.
satya - Thu Nov 01 2012 09:57:34 GMT-0400 (Eastern Daylight Time)
Here is the callback function parent.onDateSet()
public void onDateSet(int buttonId, int year, int month, int day)
   {
      Calendar c = getDate(year,month,day);
      if (buttonId == R.id.fromButton)
      {
         setFromDate(c);
         return;
      }
      setToDate(c);
   }

   private void setFromDate(Calendar c)
   {
      if (c == null) return;
      this.fromDate = c;
      TextView tc = (TextView)findViewById(R.id.fromDate);
      tc.setText(getDateString(c));
   }
   private void setToDate(Calendar c)
   {
      if (c == null) return;
      this.toDate = c;
      TextView tc = (TextView)findViewById(R.id.toDate);
      tc.setText(getDateString(c));
   }
   private Calendar getDate(int year, int month, int day)
   {
      Calendar c = Calendar.getInstance();
      c.set(year,month,day);
      return c;
   }
   public static String getDateString(Calendar c)
   {
     if(c == null) return "null";
     SimpleDateFormat df = new SimpleDateFormat("MM/dd/yyyy");
     df.setLenient(false);
     String s = df.format(c.getTime());
     return s;
   }
satya - Thu Nov 01 2012 09:59:21 GMT-0400 (Eastern Daylight Time)
Taking hold of the view state management
if we use this compound control multiple times in an activity then the ids for the text views and the button views will get repeated. This will not work for managing their own view state.
So the compound control needs to take control of this and not pass on the save and restore methods. What follows is how you do that.
satya - Thu Nov 01 2012 10:01:12 GMT-0400 (Eastern Daylight Time)
Override dispatchSaveInstanceState and call dispatchFreezeSelfonly
@Override
   protected void dispatchSaveInstanceState(SparseArray<Parcelable> container) {
      //Don't call this so that children won't be explicitly saved
      //super.dispatchSaveInstanceState(container);
      //Call your self onsavedinstancestate
      super.dispatchFreezeSelfOnly(container);
      Log.d(tag,"in dispatchSaveInstanceState");
   }
when you do this, you are calling onSaveInstanceState on your self but not on your children. This done through the base class's dispatchFreezeSelfOnly. Read the research logs on why.
satya - Thu Nov 01 2012 10:01:33 GMT-0400 (Eastern Daylight Time)
Do the same for dispatchRestoreInstanceState
@Override
   protected void dispatchRestoreInstanceState(
         SparseArray<Parcelable> container) {
      //Don't call this so that children won't be explicitly saved
      //.super.dispatchRestoreInstanceState(container);
      super.dispatchThawSelfOnly(container);
      Log.d(tag,"in dispatchRestoreInstanceState");
   }
satya - Thu Nov 01 2012 10:01:55 GMT-0400 (Eastern Daylight Time)
This approach is just cut and paste every time you do this compound controls
This approach is just cut and paste every time you do this compound controls
satya - Thu Nov 01 2012 10:02:25 GMT-0400 (Eastern Daylight Time)
Implement your own saved state
/*
     * ***************************************************************
     * Saved State inner static class
     * ***************************************************************
     */
    public static class SavedState extends BaseSavedState {
       //null values are allowed
        private Calendar fromDate;
        private Calendar toDate;

        SavedState(Parcelable superState) {
            super(superState);
        }
        @Override
        public void writeToParcel(Parcel out, int flags) {
            super.writeToParcel(out, flags);

            if (fromDate != null)
            {
               out.writeLong(fromDate.getTimeInMillis());
            }
            else
            {
               out.writeLong(-1L);
            }
            if (fromDate != null)
            {
               out.writeLong(toDate.getTimeInMillis());
            }
            else
            {
               out.writeLong(-1L);
            }
        }

        @Override
        public String toString() {
           StringBuffer sb  = new StringBuffer("fromDate:" + DurationControl.getDateString(fromDate));
           sb.append("fromDate:" + DurationControl.getDateString(toDate));
           return sb.toString();
        }

        @SuppressWarnings("hiding")
        public static final Parcelable.Creator<SavedState> CREATOR
                = new Parcelable.Creator<SavedState>() {
            public SavedState createFromParcel(Parcel in) {
                return new SavedState(in);
            }
            public SavedState[] newArray(int size) {
                return new SavedState[size];
            }
        };

        //Read back the values
        private SavedState(Parcel in) {
            super(in);

            //Read the from date
            long lFromDate = in.readLong();
            if (lFromDate == -1)         {
               fromDate = null;
            }
            else          {
               fromDate = Calendar.getInstance();
               fromDate.setTimeInMillis(lFromDate);
            }
            //Read the from date
            long lToDate = in.readLong();
            if (lFromDate == -1)         {
               toDate = null;
            }
            else          {
               toDate = Calendar.getInstance();
               toDate.setTimeInMillis(lToDate);
            }
        }
    }//eof-state-class
satya - Thu Nov 01 2012 10:04:13 GMT-0400 (Eastern Daylight Time)
Now you can do this
@Override
   protected void onRestoreInstanceState(Parcelable state) {
      Log.d(tag,"in onRestoreInstanceState");
      if (!(state instanceof SavedState)) {
           super.onRestoreInstanceState(state);
           return;
      }
      //it is our state
      SavedState ss = (SavedState)state;
      //Peel it and give the child to the super class
      super.onRestoreInstanceState(ss.getSuperState());
      //this.fromDate = ss.fromDate;
      //this.toDate= ss.toDate;
      this.setFromDate(ss.fromDate);
      this.setToDate(ss.toDate);
   }

   @Override
   protected Parcelable onSaveInstanceState() {
      Log.d(tag,"in onSaveInstanceState");
       Parcelable superState = super.onSaveInstanceState();
       SavedState ss = new SavedState(superState);
       ss.fromDate = this.fromDate;
       ss.toDate = this.toDate;
       return ss;
   }
Notice that there is no good way to pass the local variable to the state class through the constructor. Actually try it. You will know why. So we might as well declare them public and not worry about get/set methods.
satya - Thu Nov 01 2012 10:04:49 GMT-0400 (Eastern Daylight Time)
What custom component is complete with out custom attributes
<resources>
<declare-styleable name="CircleView">
    <attr name="strokeWidth" format="integer"/>
    <attr name="strokeColor" format="color|reference" />
</declare-styleable>
<declare-styleable name="DurationComponent">
    <attr name="durationUnits">
      <enum name="days" value="1"/>
      <enum name="weeks" value="2"/>
    </attr>
</declare-styleable>
</resources>
satya - Thu Nov 01 2012 10:05:26 GMT-0400 (Eastern Daylight Time)
Here is how you read these enums
public DurationControl(Context context) {
      super(context);
      // TODO Auto-generated constructor stub
      initialize(context);
   }

   public DurationControl(Context context, AttributeSet attrs, int defStyle) {
      super(context, attrs, defStyle);
      TypedArray t = context.obtainStyledAttributes(attrs,R.styleable.DurationComponent,0,0);
        durationUnits = t.getInt(R.styleable.DurationComponent_durationUnits, durationUnits);
        t.recycle();
      initialize(context);
   }

   public DurationControl(Context context, AttributeSet attrs) {
      this(context, attrs,0);
   }

   private void initialize(Context context)
   {
      LayoutInflater lif = (LayoutInflater)
      context.getSystemService(Context.LAYOUT_INFLATER_SERVICE);
        lif.inflate(R.layout.duration_view_layout, this);
        Button b = (Button)this.findViewById(R.id.fromButton);
        b.setOnClickListener(this);
        b = (Button)this.findViewById(R.id.toButton);
        b.setOnClickListener(this);
        this.setSaveEnabled(true);
   }
satya - Thu Nov 01 2012 10:59:49 GMT-0400 (Eastern Daylight Time)
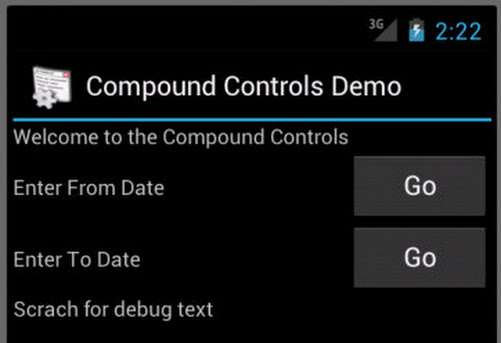
Here are some images: What this control looks like

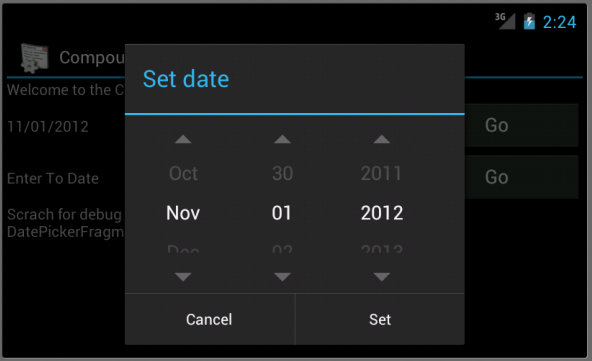
This control is between the welocme text and the debug text. See the layout file above in the source code. The GO button will bring up the date picker. See images below.
satya - Thu Nov 01 2012 11:15:25 GMT-0400 (Eastern Daylight Time)
Date picker

satya - Thu Nov 01 2012 11:16:49 GMT-0400 (Eastern Daylight Time)
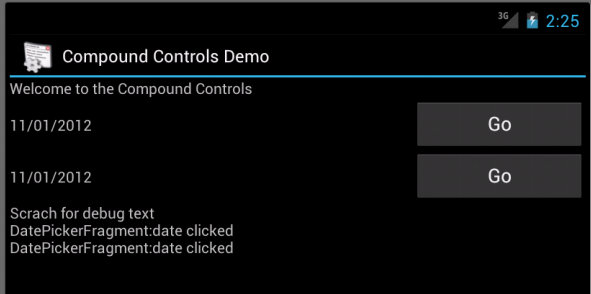
Date captured

satya - Thu Nov 01 2012 11:17:47 GMT-0400 (Eastern Daylight Time)
Managing rotation while the dialog is up: landscape

satya - Thu Nov 01 2012 11:18:24 GMT-0400 (Eastern Daylight Time)
Date captured in landscape

satya - Thu Nov 01 2012 11:19:18 GMT-0400 (Eastern Daylight Time)
Rotated back to portrait: save state of the compound view gets kciked in

